
Activating an entitlement for network licenses
The role of the License Manager software is to manage network licenses that you create by activating some or all of your Analyst's Notebook entitlement. To get those licenses to License Manager, you download them in a file from the i2 EMS portal.
In the same way that a standalone license is locked to an Analyst's Notebook workstation, network licenses are locked to the computer that runs License Manager. Therefore, before you can create network licenses, you must retrieve the hardware identifier of the host computer.
If License Manager is running on an Analyst's Notebook workstation, you can use Analyst's Notebook to discover the hardware identifier. If not, you can use a utility named echoid.
Locate the echoid (or echoid64) utility and its accompanying echoid.dat file in the Entitlement Management\Utils\<Platform> directory.
Important: echoid can be configured to display the hardware identifier in a number of different ways. The supplied echoid.dat file contains settings to produce the locking code that you need.
Copy the two files to the computer that's running License Manager. Then, on that computer, open a command prompt and navigate to the directory that contains the copied files.
Run echoid from the command line. The utility displays the locking code:
Sentinel RMS Development Kit 10.1.0.31 Host Locking Code Information Utility
Copyright (C) 2023 THALES
      All Rights Reserved.

             Locking Code 1     :   4-*16X 66QD 9UPR VGJX
Important: If the displayed locking code does not have a 4- prefix, verify that you ran echoid from inside the directory that contains it, and that the echoid.dat file is alongside it.
When you use the locking code in the i2 EMS portal, you drop the 4- prefix and remove the spaces. In this example, the code to use would be *16X66QD9UPRVGJX.
Next, to activate an entitlement for network licenses, you log on to the i2 EMS portal and use the locking code from your License Manager to generate a license file.
The first part of the procedure is the same as the one for generating a standalone license file. Follow those instructions as far as clicking Activate in the portal.
To specify that some of your entitlement should take the form of network licenses, choose the Network license variant and set the quantity to activate.
The portal now prompts for the locking code that you discovered with the echoid tool, like this:
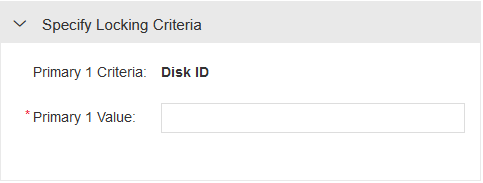
Paste the locking code into the empty field and click Complete Activation.
The portal displays the file containing network licenses that you just generated, together with options to send it by email or save it to local storage.
Now, you have the network licenses for License Manager to manage. The final step is to install the licenses on License Manager and invite your users to connect to it.
Open WlmAdmin.exe, select the computer that's running the License Manager from the Subnet Servers list, and click Add Feature:
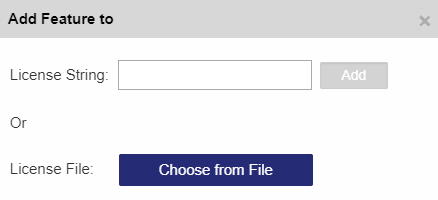
Click Choose from File, and locate the file that you downloaded from the i2 EMS portal.
When you choose the file, a feature - that is, your licenses - is added to the License Manager. You'll see information similar to the following example:
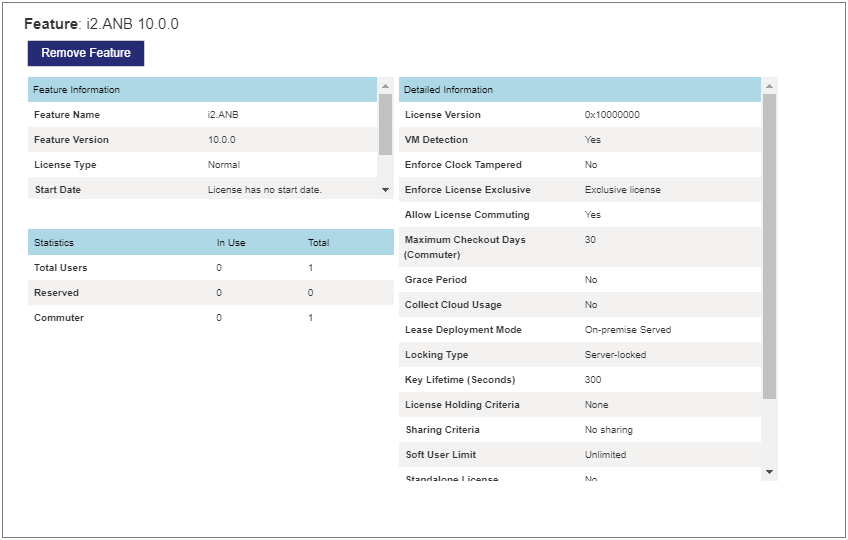
After you add the feature, the Statistics panel provides information about the number of network licenses in the pool, as well as how they're being used. For more information, see Managing network licenses.
Using a network license in i2 Analyst's Notebook
At this stage, License Manager is ready to provide licenses to Analyst's Notebook users. They can start Analyst's Notebook 10 from workstations on the same network as License Manager, and then follow the instructions for using a network license.
If you have administrative control over a workstation, you can configure Analyst's Notebook to connect to License Manager and retrieve a license automatically, without user intervention. Doing so means Installing Analyst's Notebook from the command line.
In this case, you need to use the I2LIC_SERVERS option when you run the msiexec command to install Analyst's Notebook, like this:
msiexec /i "i2 Analyst's Notebook 10.msi" I2LIC_SERVERS=<IP Address>Here, <IP Address> is the address on the local network of the computer that's running License Manager.
With this setting in place, and provided that License Manager has licenses available, Analyst's Notebook users don't need to configure licensing for themselves. However, they can still take advantage of borrowed licenses if they want to.