Set up an advanced configuration
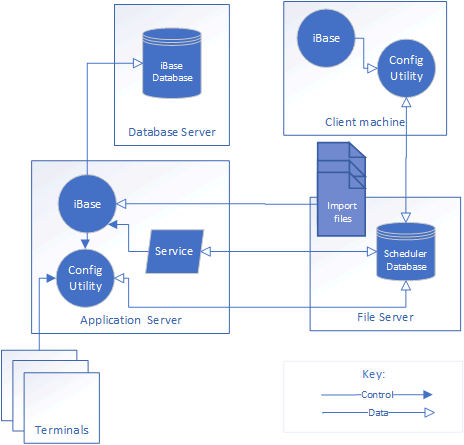
Within an enterprise environment, it is unlikely that all the components required for iBase and Scheduler are on the same machine.
It is possible that:
- A dedicated SQL Server machine stores the iBase database.
- A file server has the iBase database connection file, Scheduler database, import files, and trigger files and is the destination for export files.
- An application server runs the Scheduler Service and is accessed through terminals to run iBase and the Scheduler Configuration utility.
- The configuration utility can also be installed on users' PCs.

Before you install Scheduler
Before you install Scheduler, the following preparatory actions must be carried out:- Create a domain account for the Scheduler service. Set the ‘Password never expires’ option for this account.
- Create a folder on the file server for the Scheduler database. Share this folder and ensure that the Everyone group has Full Control of the share.
- Assign the required security permissions through NTFS security on the
Scheduler database folder to the following domain accounts:
- Scheduler Service account.
- Any users that configure Scheduler. For example, create a Windows™ group for this purpose and assign the permissions to the group rather than to individual users. When a new user is to configure Scheduler, they can be added to this group.
- Installation user. This is not required if the user that installs the Scheduler service is already a member of the Windows group for Scheduler users.
- Map a drive on the application server to the Scheduler database folder on the file server.
Installing Scheduler on the server
Install the Scheduler on the application server, selecting both the Service and Configuration options in the installer. You can choose where to install the Scheduler database. Typically, the default location for the Scheduler database is:C:\Documents and Settings\All Users\Application Data\i2\i2 iBase 8\en-us\Scheduler\Scheduler.mdb
You can move the database to a different shared folder if required. You are prompted for the location of the Scheduler database when you first start the Scheduler Configuration utility.
To display the Scheduler Configuration, select .
Setting the permissions
After the installation, the Scheduler service account will require permission to access the following information:- Connection and security files for any of the iBase databases in use by the Scheduler Configuration utility.
- Import and trigger files.
- The destination folder for export files.
For SQL Server databases, the Scheduler service account requires access to the databases on the SQL server that are referenced by the connection files.
When you configure Scheduler in a
distributed environment, it is important to use UNC paths throughout the Scheduler Configuration
utility and within the import and export specifications themselves.
Note: The use of more than one
Scheduler service monitoring the same Scheduler database is not supported in this release because of
the risk that each instance of the Scheduler service might run the same import specification. This
might result in duplicate entities and links created in the iBase database, depending on how the
individual import specifications are set up to handle duplicated data read from import
files.
