
Highlight queries
You can configure highlight queries to work with your iBase database. Highlight queries are used to highlight specific data in the i2 Explore for iBase user interface, such as entities, links, and attributes. This allows users to quickly identify important information in their data.
To configure highlight queries to work with your iBase database, you first need to deploy the application. See Deploying the application. This generates a highlight queries XSD file, based on the schema in the connected iBase database, to the following location:
<installation_location>/analyze-deployment-tooling/configs/explore-for-ibase/configuration/highlight-queries-configuration.xsd
Create highlight queries using the i2 Explore Administration Console
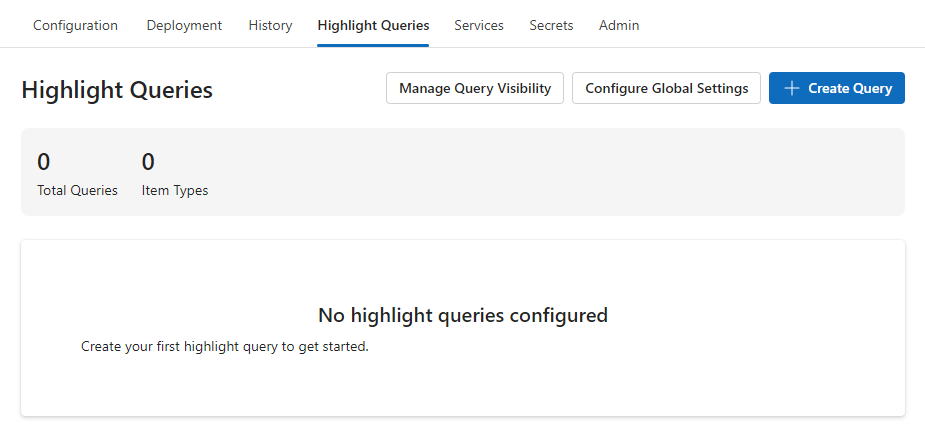
The recommended way to create highlight queries for your deployment is using the i2 Explore Administration Console. After you deploy the application, you can create, edit, and delete highlight queries on the Highlight Queries tab.
This video provides a detailed walkthrough of how to use the highlight query editor in the Administration Console.
You can link to the video directly here.
Create a new highlight query
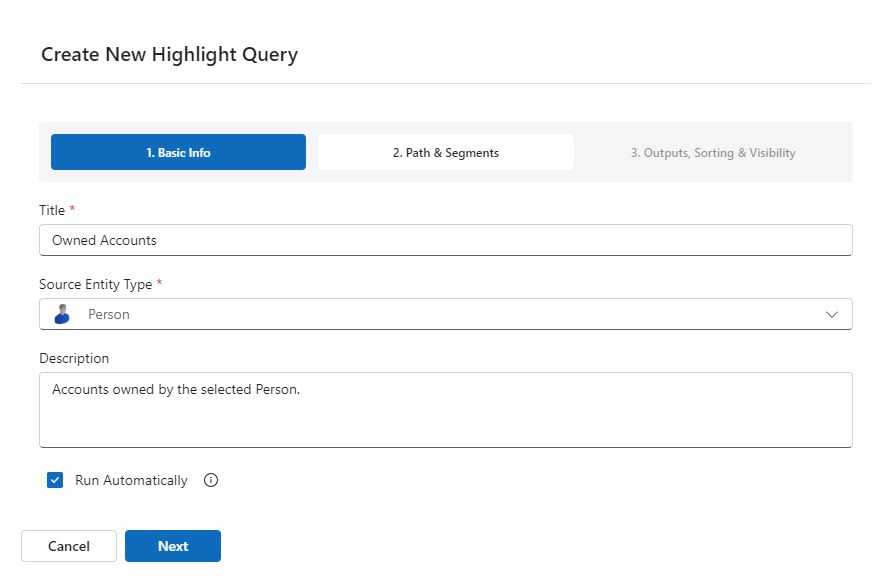
You can create a new highlight query by clicking the Create Query button. This opens the Create New Highlight Query dialog.
Basic information
Provide the following information:
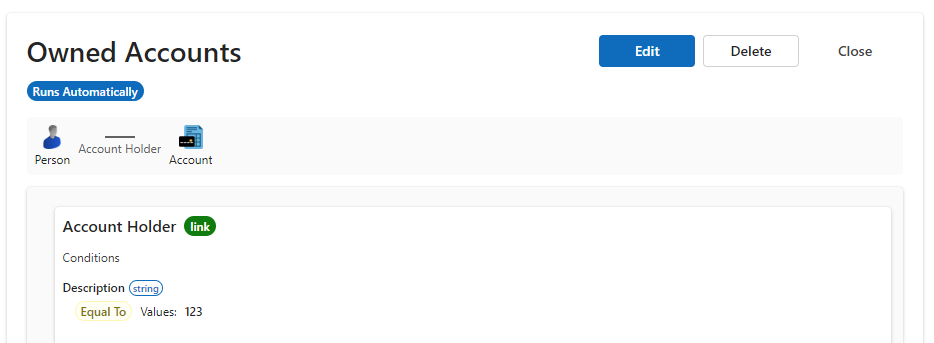
Title: The title displayed as the heading of the highlight pane. This is a required field.
Source Entity Type: The entity type that this query applies to. This is a required field.
Description: An explanation of the behavior of the query, displayed to users when they click the information icon in a highlight pane heading. i2 recommends that you describe the relationship of the results to the subject record, and the order in which you present them.
Run Automatically: When selected, the query runs automatically when a record is viewed. When not selected, users must run it manually.
Click Next, or click the 2. Path & Segments button to configure the path and segments for the query.
Path & Segments
A query must contain at least one path segment. By default, this page contains a single segment. You can add segments using the Add Segment button, and remove them using the Remove Segment button.
Each segment consists of a Link Item and an Entity Item.
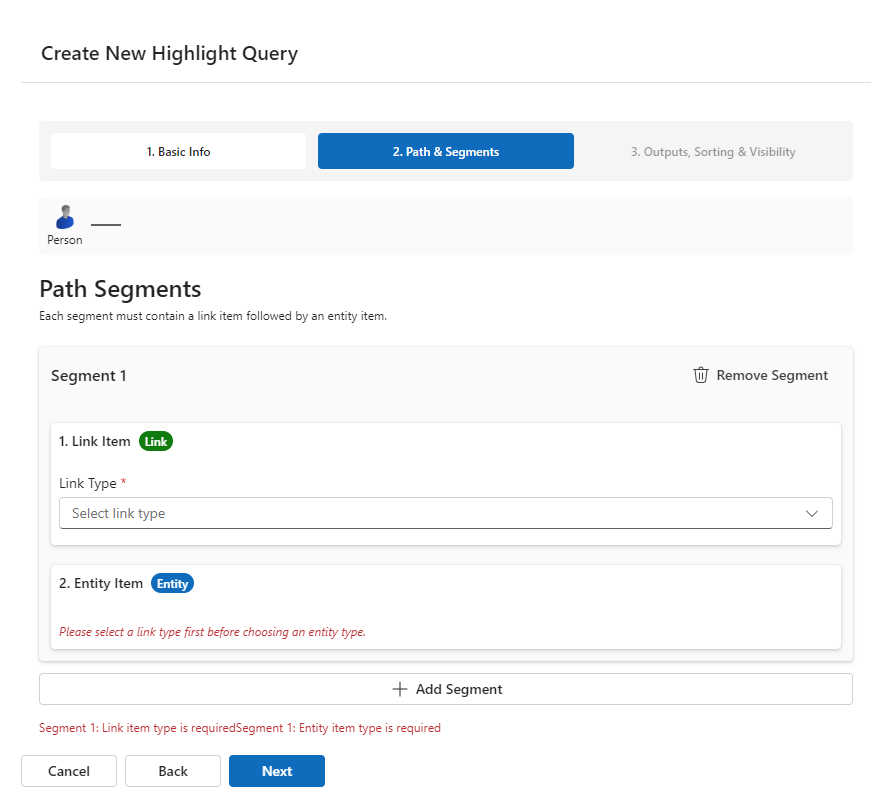
Link Item
Provide the following information for a Link Item:
Link Type: In the first segment, this is the type of link that connects to the Source Entity Type. In subsequent segments, it is the link type that connects to the Entity Type from the previous segment. This is a required field.
Direction: Constrains matching records according to whether their direction is towards (Incoming) or away from (Outgoing) the entity record that forms the input to the segment.
Conditions: For more information, see Conditions.
Export Fields: For more information, see Export Fields.
Entity Item
Provide the following information for an Entity Item:
Entity Type: The entity type that connects to the Link Item in the same segment. This is a required field.
Conditions: For more information, see Conditions.
Export Fields: For more information, see Export Fields.
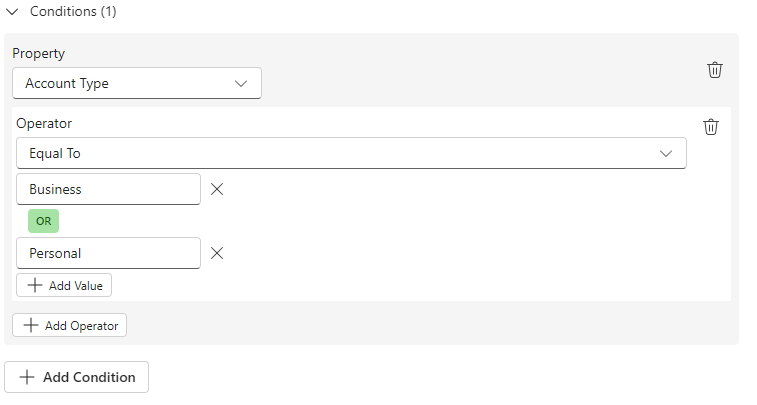
Conditions
A Link Item or Entity Item can contain any number of conditions. Each condition corresponds to a property type of the entity or link type in question, and places a requirement on the values that matching records must have.
Some logical types — geospatial values, multiple-line strings, documents, pictures, and XML data — are not supported in highlight query conditions. The Property field contains only valid values for the selected Link Type or Entity Type. This version of i2 Analyze supports conditions with four kinds of operators:
For all valid property types, you can use the Is Set and Is Not Set operators to specify that matching records must or must not have a value for the property with that type.
For property types whose properties have string values, you can use the Equal To and Not Equal To operators to specify that matching records must have a value that exactly matches, or does not match, a value that you provide.
For property types whose properties have numeric values, you can use the Greater Than, Less Than, Greater Than Or Equal To, and Less Than Or Equal To operators to specify that matching records must have a property value with the specified relationship to a value that you provide.
For property types whose properties have date and time values, you can use the In The Preceding operator to specify that matching records must have a value that occurred within a specified period before the current date. The value must be an integer, and the unit can be Weeks, Months, or Years.
If you specify conditions on multiple property types in the same segment, their effects are ANDed together. For example, if your conditions are "given name equal to 'John'" and "family name equal to 'Doe'", then only records for which both conditions are true appear in the results.
If you use multiple operators against the same property type, their effects are ORed together. For example, you might specify that a property must either be not set or have one of a set of values. You cannot use the same operator more than once, and you cannot use more than one numeric operator at the same time.
To add a condition:
Click Add Condition.
Select the Property for the condition from the drop-down list.
Select an Operator from the drop-down list.
If the selected operator requires a value, enter a value in the value field.
To add more values, click Add Value. Additional values are ORed with other values in the same condition.
To add more operators, click Add Operator. Additional operators are ORed with other operators in the same condition.
To add more conditions, click Add Condition. Additional conditions are ANDed with other conditions in the same Link Item or Entity Item.
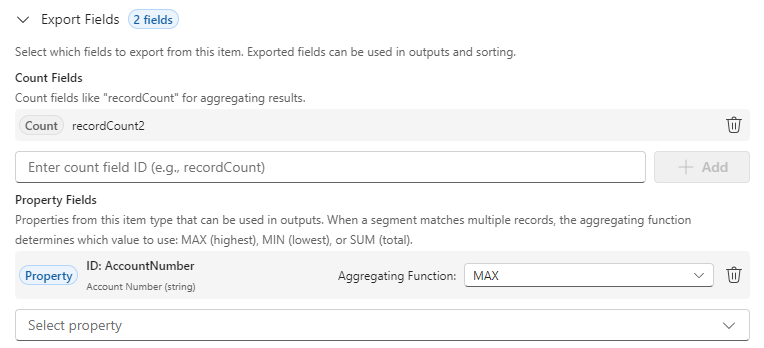
Export Fields
Highlight queries allow customization of the properties of the result records that are displayed to the user (Output Fields) and also the order that results are displayed to the user (Sort By). Both of these things are configured in the Outputs, Sorting & Visibility section, but before you can do that, you need to Export the fields from the query that you want to use for display or sorting. This is what Export Fields are for.
A Link Item or Entity Item can contain any number of export fields. You can use Count Fields to export the number of records in a match set. Property Fields export properties from the enclosing item type for use in outputs. When a segment matches multiple records, the aggregating function determines which value to use: MAX (highest), MIN (lowest), or SUM (total).
To add a Count Field:
Enter a name in the Count Field text box. This name appears when you choose properties to output or sort by on the 3. Outputs, Sorting & Visibility page.
Click Add.
To add a Property Field:
Select the property to export from the drop-down list. A Field ID is set automatically based on the name of the property, but you can change it. This name appears when you choose properties to output or sort by on the 3. Outputs, Sorting & Visibility page.
Click Add.
Select the desired Aggregating Function from the drop-down list.
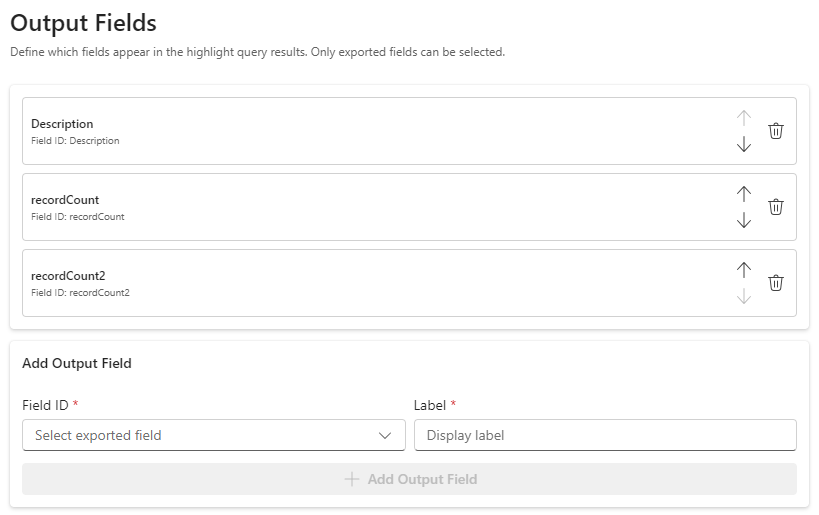
Outputs, Sorting & Visibility
Outputs control the values that users see with the query results in a highlight pane. You can define any number of output fields. Each output field has the following attributes:
Field ID: The ID of an exported count or property field from the 2. Path & Segments page.
Label: The value that the interface uses as a column header for the field.
To add an output field:
Select a value from the Field ID drop-down list.
Note: If you have not exported any fields on the 2. Path & Segments page, the Field ID drop-down list contains no values.
Enter a value in the Label field.
To change the order that output fields appear as column headers, use the Up and Down arrows in the list. To delete an output field, click Delete.
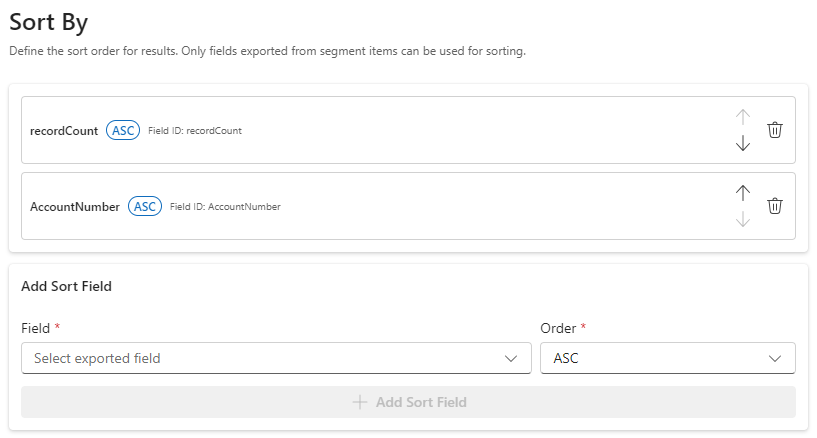
The Sort By field specifies how values discovered during query execution determine the order of results that users see. For example, you might sort a list of people associated with a vehicle by their family names or by their dates of association. Sort By fields are processed in order of appearance. Each Sort By field has the following attributes:
Field: The identifier of a field exported from the path.
Order: Determines whether results appear in ascending (ASC) or descending (DESC) order.
To add a Sort By field:
Select a value from the Field drop-down list.
Note: If you have not exported any fields on the 2. Path & Segments page, the Field drop-down list contains no values.
Select a value from the Order drop-down list.
To change the order of Sort By fields, use the Up and Down arrows in the list. To delete a Sort By field, click Delete.
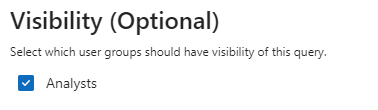
To control which users can see this query, select one or more Category Definitions from the Visibility section of the 3. Outputs, Sorting & Visibility page. If no Category Definitions are selected, all users can see the query. If one or more Category Definitions are selected, only users in groups within the selected category definitions can see the query. For more information on setting up category definitions, see Manage Highlight Query Visibility.
Note: The Visibility section is not displayed if no category definition entries exist.
When you are satisfied with the configuration, click Create Query to create and save the query.
Edit a highlight query
To edit a highlight query, select the query and click Edit. For guidance on changing the content of a query, see Create a new highlight query.
Delete a highlight query
To delete a highlight query, select the query and click Delete.
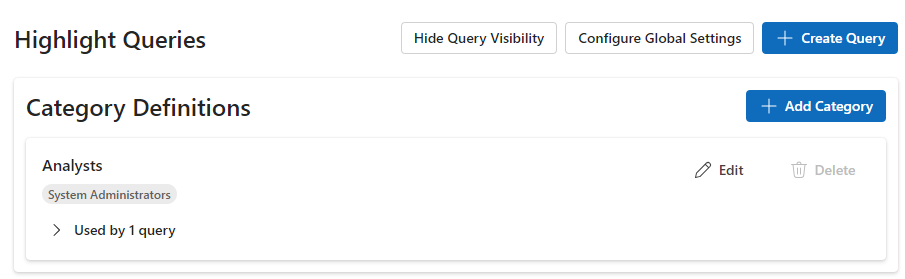
Manage highlight query visibility
You can control which users see a highlight query by assigning it to one or more categories. A category specifies the user groups whose members can see the highlight queries associated with it. A highlight query that has no categories associated with it are visible to all users.
Click Manage Query Visibility to open the Category Definitions panel.
Create a new category definition
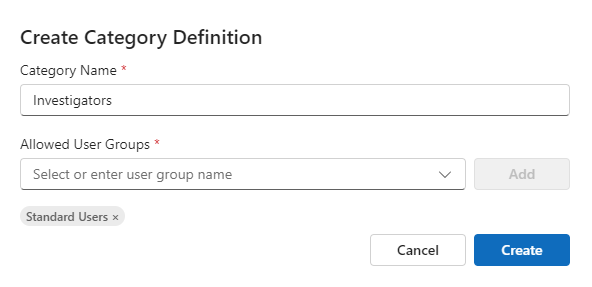
Click Add Category to open the Create Category Definition dialog.
Enter a value in the Category Name field.
Select a group from the Allowed User Groups drop-down list and click Add.
Repeat the previous step for any additional groups.
Note: The Allowed User Groups drop-down list contains user groups from the iBase database selected on the Configuration tab.
To remove a group from a category definition, click Click to Remove on the group that you want to remove.
Apply a category definition to a highlight query
To apply one or more category definitions to a query, open a query by clicking Create Query for a new query, or by clicking Edit on an existing query. In the Visibility section of the 3. Outputs, Sorting & Visibility page, select the category definitions that you want to apply.
Edit a category definition
To edit a category definition, click Edit on the category definition that you want to change, then follow the steps in Create a new category definition.
Delete a category definition
Category definitions cannot be removed if they are in use on a highlight query. Each category definition indicates which queries it is currently assigned to. Once a category definition has been removed from all highlight queries, click Delete to remove it.
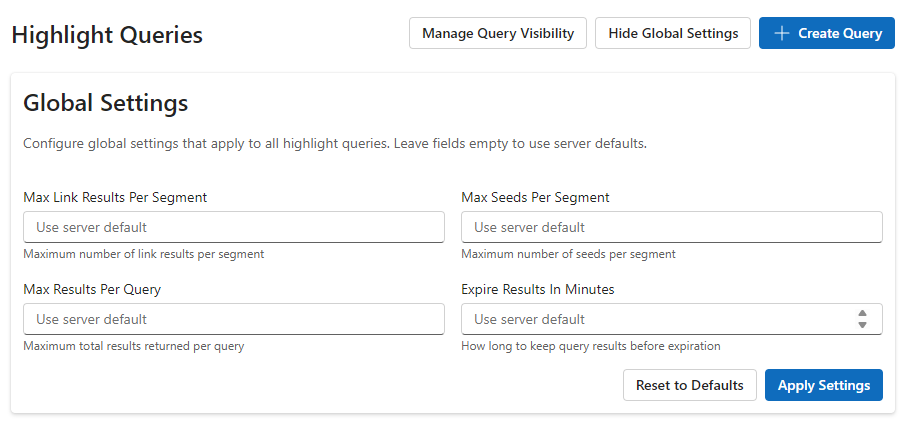
Configure global settings
You can control aspects of highlight query behavior that affect the performance of the i2 Analyze server by clicking Configure Global Settings. The following settings are available:
Max Link Results Per Segment: The maximum number of link records that a single segment can match in the Information Store. The default is 50000.
Max Seeds Per Segment: The maximum number of entity records that any segment except the last can match in the Information Store. The default is 1000.
Max Results Per Query: The maximum number of entity records that the last segment can match in the Information Store. The default is 1000.
Expire Results In Minutes: The length of time for which the server caches the results of a highlight query. The default is 30 minutes.
When you have entered your settings, click Apply Settings.
Deploying highlight queries using the Administration Console
When your changes are in place, deploy the file to the application. See Deploying the Application.
Configuring highlight queries using the configuration file
When the highlight query XSD file has been generated, you can create a highlight query file that conforms to the XSD schema. For more information, see the following documentation:
When you have created the highlight query xml file, place it in the following location:
<installation_location>/analyze-deployment-tooling/configs/explore-for-ibase/configuration/highlight-queries-configuration.xml
This video provides a detailed walkthrough for technical users of how to configure highlight queries:
You can link to the highlight query video walkthrough directly.
When the file is in place, deploy the file to the application. See Deploying the Application.